Last week I gave you some advice on how to start refining the vision you have for your dream bathroom. Hopefully you’ve asked those foundational questions and taken stock of your space to define the area that you have to play with before either getting too carried away with grand plans or limiting yourself unnecessarily. Today I’m going to go through some of the basics of a bathroom layout, as well as standard dimensions to consider.
Function needs to drive Form
This is true of any room, but is especially true in smaller spaces like bathrooms. Sometimes, it’s hard to reimagine our spaces because we get accustomed to what we have and where we have it. IF you can, it’s great to start with a blank slate and not get too caught up with what is. Bathrooms are usually limited with what we can change, especially if it is not associated within a larger house update. After all, there is only so much real estate to work with in a standard 5’ by 8’ room. However, even a small change can make a bit impact.
Pro-Tip – Keeping as much infrastructure in the same place. Particularly with regards to the plumbing. This helps to keep costs down but don’t discount moving it if it will make the space function much better – the cost might be worth it!
Common Bathroom Layouts
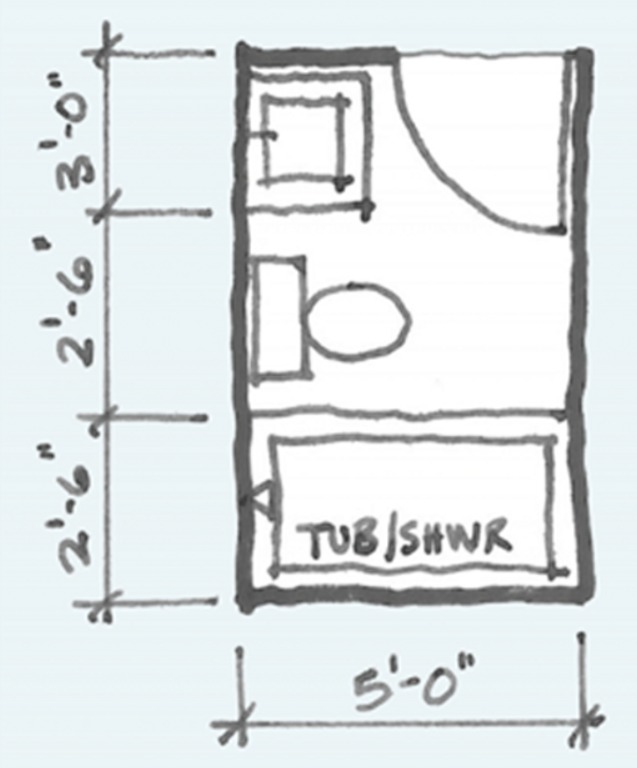
There are 3 layouts that are pretty commonly found in a classic 5′ by 8′ bathroom.
3-in-a-Row
The vanity, toilet and tub/shower are all along the same wall which is really convenient for the plumbers. If you can steal space from an adjacent room, this layout allows you to have a bigger vanity or a separate shower.

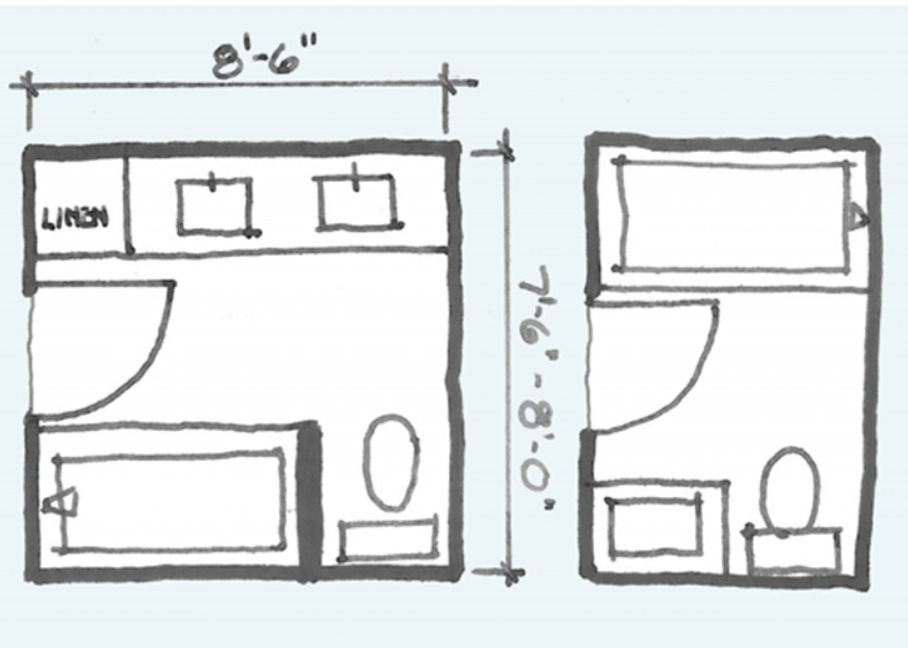
Galley Style
The tub/shower is on one side of the room while the toilet and vanity are on the opposite side. If you’re lucky enough to have a bit bigger of a footprint, you may be able to have a double sink vanity and/or a tall storage unit.

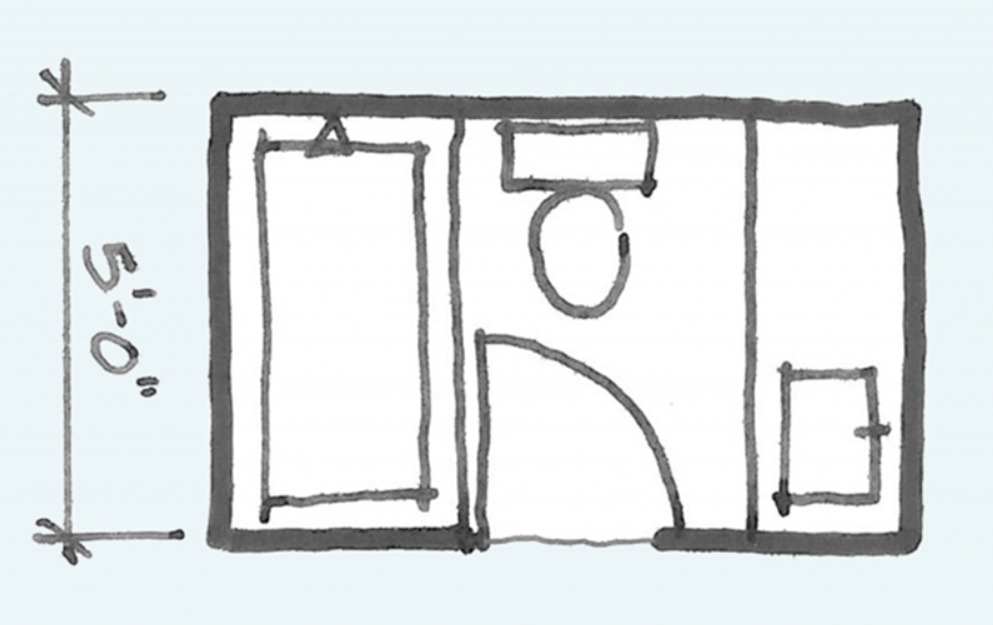
Throne Design
This is the worst layout in my opinion. There’s almost nothing worse than being greeted by the toilet – aka the throne – as soon as you open the bathroom door.

As you get into larger square footage rooms, the ability to shift things around and add the luxurious touches that most of us salivate over (free standing soaker tubs, jumbo showers with dual heads and jets, loads of storage etc.) is where playing with layout becomes more possible.
Choosing the best layout for your space
When I’m involved with the design phase of the project, and we’ve defined the boundaries and/or any structural changes for the space, I usually start by placing items that will anchor the space. In a bathroom we’re looking at the toilet, tub, shower & vanity. I play with this in AutoCad and if you’re tech savvy there are numerous online programs that you can use such as Sketch-Up. If you’re not, you can play with the locations on a piece of grid paper – just keep in mind the scale.
Designing with paper
1. Measure your room out with a tape measure as accurately as you can, but don’t fret over a ¼” here or there, this is just preliminary work.
2. Draw the perimeter of the room on the paper and locate any windows and doors – the grid squares can be at whatever scale works for the size of your
room and the paper – 1 square can equal 3”, 4” or 6” or whatever you feel works for you.
For example a 3’ wide door or window using 6” to a foot scale would be 6 squares wide.
3. Draw and cut out the anchor items so they are loose – using, and this is really important – the SAME SCALE.
4. Then start placing and moving them to see what options may feel the best for you – saves a lot of erasing! ….check out the show notes on the All
Things Renovation website for an example of what I’m describing.
Typical Dimensions to Consider
Bathtub and Showers
• A standard tub is 2’-6” by 5’-0”. However, you can get ones wider — 3’ is common, and a shorter 4’-6” is common enough. Free standing or a soaking tubs require a larger footprint – at least 3’ x 6’.
• Freestanding tubs need more to look right in the space. At a minimum 6” on all sides. The tub filler can come out of the wall or be floor mounted. There are also hybrid options out there where the tub is tight along one wall but the ends are open to the room which are sometimes enough of a space saver to allow having one in your design.
• A good two-person shower is 3’ x 6’. A nice one person shower is 3’ square. Technically it could be smaller but raising your hands over your head becomes more difficult. There are all kinds of shower pans you can buy but if you have a funky space, you can opt for a custom shower pan which then has no limitations.
Toilets
.• For toilets in a single family residential application by code here in BC you need 15” clear from the centre of the toilet to a wall or side of a vanity or 30” overall. If you have accessibility concerns, then bump it to be in the 36” range.
• A wall-hung toilet can save you about a foot in floor space at the front – you still need the space on either side – something to be aware of is that you’ll need extra in wall structural framing for the toilet to hang from.
Vanities
• Vanities are usually 22” deep but can vary to suit the sink you choose. I’ve seen ones as narrow as 12” with a vessel sink and ones 24” deep with large pan style. Widths vary from 24”- 42” or more for a single sink.
.• A double vanity can be as narrow as 5’ wide. However, you’ll see narrower ones at places like IKEA, but I think they’re a bit of a squeeze. You can sometimes get away with one trough sink (with two wall-mounted faucets) to make things feel less cramped.
• Bathrooms designed for aging-in-place, and for people who need grab bars or more accessible design will need more room in almost every direction for all elements. While all of these layouts can be modified, the classic three-in-a-row is the hardest to make truly accessible.
I always like to try and put some storage solutions in a bathroom if I can – even if it’s using the space between the studs for some built-in shelving hidden or open. So be sure to keep in mind ways to be creative as every bit helps.
To listen to the full episode and read the show notes, visit www.AllThingsRenovation.com or click on the Podcast tab at the top of our homepage at www.woodbeart.com.


